
LINQ: Basics, But Still Pretty Advanced(Part-I)

Let’s begin our descent into the realm of LINQ with an appetizer, before bringing in the main course.
You will find two solid examples based on this one example which will provide you with a framework sturdy enough to support what you will learn in the coming posts.
Both examples are based on a single problem, with slight alterations, but I might have to write a separate article for the next example, seeing as this is taking up a lot of space.
Don’t worry, I will guide you through them step by step.
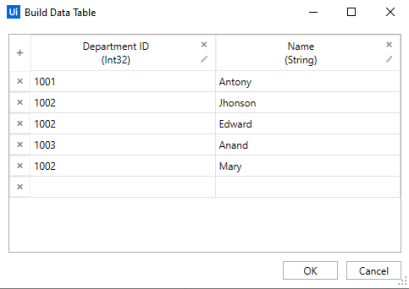
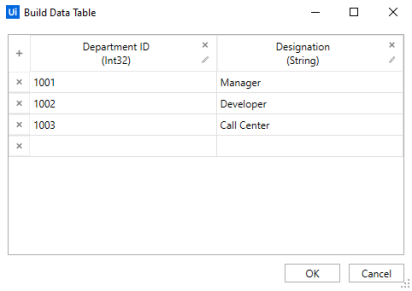
I’ve define the data you have to work with down below. Here is a screenshot of the elements present in our DataTables.
Here comes Example #1.
You have to create a DataTable Dt3, with values coming from Dt1 and Dt2.
Dt1 contains the employee Names and their respective Department IDs, while Dt2 contains the Department IDs and the Designations.
Your task is to combine the data in such a way that the resulting DataTable will contain the Name from Dt1 and Designation from Dt2.
Try solving this without LINQ, before reading on.
There Are Two Ways
Which is why I divided them into two separate examples.
We will explore the first solution, which is fairly straightforward.
Since both Dt1 and Dt2 contain the same key column, we can use a Join operation here.
The joining will be performed on the basis of the Department ID, so it will look something like this:
Dt1 Join Dt2 On (Condition)
Now for the actual code.

The syntax might scare you, but trust me, spend enough time with it, and it will still scare you.

Let’s Piece Things Apart
First, we join the elements based on a condition.
But we can’t simply Join two DataTables, unless we split them up into digestible segments, which is what the .Enumerable Method does.
The DataTable has to be minced up into a collection of DataRows so that our complier may easily process it.
Now we are set to perform our arts and crafts and join it into whatever monstrosity we can think of.
From d1 In Dt1.AsEnumerable
Join
d2 In Dt2.AsEnumerable
{CONDITION}
As for the Join, it uhh…Joins.
Now For The “Condition”
The condition is relatively tame.
It looks bulky, but all it tells us is that the First Columns in Dt1 and Dt2 must match.
CInt merely converts the row items into an integer, while the .ToString.Trim is added in as a precaution in case the item we retrieve contains spaces.
You could sometimes face issues while converting strings which contain spaces.
Simply put, you can convert strings into numbers, provided the strings are numbers themselves. “123” which is currently in string format(Notice the quotations?), can be converted into a number, but “123 “ can sometimes result in an error. That space is going to cause a lot of problems for us.
Also,
You can’t CInt a Variable.Trim
The variable comes in the form of an “Object” and if you don’t know what an Object is, here is an article on that.
The .Trim Method is only accessible to strings, hence the additional reference.
CInt(Variable.ToString.Trim)Some take it even further and combine it with a “0”, in case the item being iterated is null or empty.
Sometimes, the variable might not contain any value, and the program will try to convert an empty variable to integer because it does what it’s told without question.

CInt(“0” & Variable.ToString.Trim)But we don’t have to delve into all of that complexity for the moment, so we will stick with the condition as follows.
d1(0).ToString Equals d2(0).ToStringThe Index being passed into dX(Index) references the Column Number, while dX is the Row, so don’t mix the two up. Also, the indexing starts from zero, so don’t mess that up either.
Here is another tip, you may reference the columns by passing in the exact names as well.
d1(“Department ID”).ToString Equals d2(“Department ID”).ToStringThis Is Too Complicated. What Will The Method Syntax Look Like?
I know I mentioned in my previous article that the Method Syntax is a lot easier to use for beginners just starting off with LINQ, but I forgot to include one additional point.
Every LINQ statement returns the same type of result, which is called an IEnumerable, so they aren’t very different.
Query Syntax is a lot easier to read, when dealing with complex projections and filtering, which is why I tend to use them more often.
But if you really wish to know what the Method Syntax will look like, here you go.

I’ve used a dictionary here, and you will know why in the next article. Also the entire query wouldn’t be visible on a single line, I divided them into segments using ” “+ “_”.
Space + Underscore is used VB.Net to enter a newline without disturbing the line of logic being constructed.
This LINQ, however, is not complete, because I don’t know enough to properly convert the filtered data into a DataTable. If I spend any more time on that query, I will have to spend some time in a mental asylum as well. It is complicated as it is, and I guess by now it’s evident as to why it’s better to create a query.
Query Syntax is much more concise and easier to read and maintain, so most of my LINQs are developed that way.
Last Crazy Bit
Now for the part where we add our filtered data into our Dt3.
Before doing so, we have to first define the schema or the structure that our Dt3 contains, so as to appropriately fill in data.
If Dt3 contains two columns Name and Designation, then the data filtered for Name has to go into the Name Column and data for Designation, into the Designation Column.
We have to define them before adding the data.
This is defined by adding the filtered results into an array before pushing that into Dt3.
New Object(){d1(“Name”), d2(“Designation”)}It is however, not necessary to include “New Object()”. This can be directly passed in as an array of DataRow that our Dt3 will gobble up.
Select Dt3.Rows.Add({d1(“Name”).ToString,d2(“Designation”).ToString})The reason why we append a .ToString Method to each item, is because the type we have provided in the DataTable for each column is String. If the column(s) are of different types, then you will have to cast them accordingly.
Last but not the least, we put the cherry on the top by appending a .CopyToDataTable method which will wrap all our data up into our DataTable Dt3.
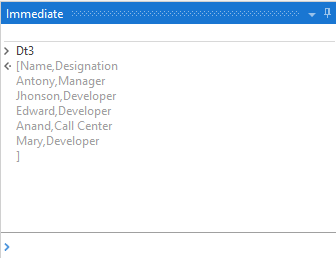
If all goes well, you will be greeted with this output in the immediate panel:
Immediate Panel? The Heck is That?
It’s a debugging tool that is made available once you run a program and add in breakpoints at appropriate locations.
I added a breakpoint right after the LINQ statement, and then pull out Dt3 on the Immediate Panel.
And that’s it for today.
If you are excited to learn more, then head over to Example #2 which will be released coming Wednesday.
I FORGOT
To mention one last point.
The Dt3 that we are writing our final data into has to be initialized with headers, or you could run into errors.
To do so, you may either clone an existing DataTable(Dt2.Clone) if the output contains the same results, or you may use a Build Data Table Activity to initialize the columns.
If only an additional column is present in the output DataTable, then you may simply drag in a Add DataColumn Activity after cloning it.